One of the biggest concerns in the industry of Software Testing will always be the concern of Investment that the Companies provide for Testing their Software services. Thus, it leaves us with only options to either reduce our UI testing resources or, better, optimize our efforts for performance testing. Well, Data Driven Testing is one such thing, that can not only optimize your Testing efforts but also can give better results with minimal efforts.
Let’s take a deep dive into this subject..
What is Data Driven Testing?
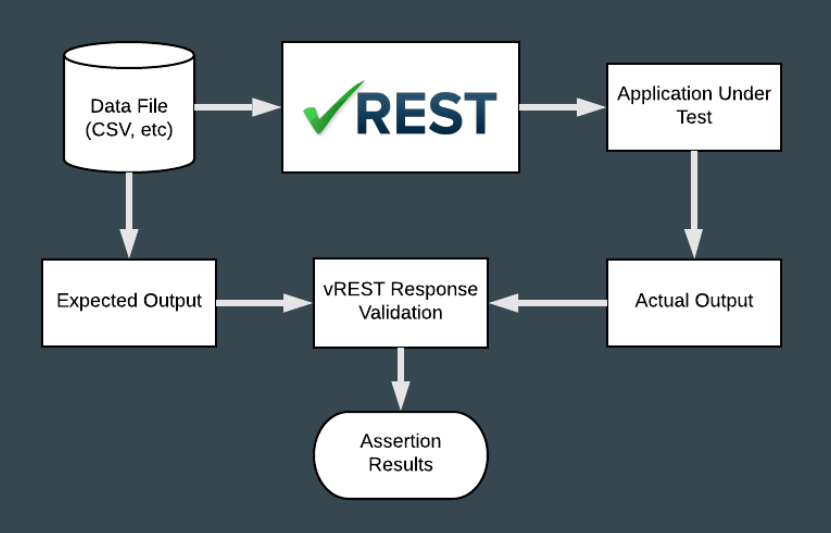
We use several methodologies in making our Software Testing processes faster and effective performance testing. Data Driven Testing is one such methodology.
It is an approach to test automation in which the Test Data is stored into an excel sheet (or any other data file), and the automation logic is written separate from the Test Data.
The UI testing Data is eventually attached to the Automation Logic through variables.
What are the benefits of Data Driven Testing?
There are many benefits of using Data Driven Testing, but let me share with you some of the benefits of API monitoring that you get when you are using Data Driven Testing in vREST (keep in mind that these benefits are confined to Data Driven Testing implementation in vREST):
-
Creates Separation of Concerns: It has always been a problem for people like, Automation Engineers who don’t want to handle a lot of Test Data or, Manual Testers who don’t have the technical knowledge to write the automation logic by themselves for API monitoring. Data Driven Testing solves this problem of API testing platform, because once you have separated the Test Data from the Automation Logic, then there will be two ways to see your testing framework:
-
Automation Logic: In vREST test cases management, your automation logic can be written in the form of test cases and for data inputs, you can leave variables, which will be used later.
-
Test Data: Once, you have made the test cases management, you can bind an excel sheet document with it where you can store test data. You can apply multiple test scenarios here without even touching the automation logic.
This way you can separate the work of writing Test Data and Automation Logic on API testing platforms, eventually saving a lot of time and effort.
-
Does not require technical knowledge: Writing test cases has always been really easy in vREST, but when there is minimal need to alter the test logic and just make changes in an Excel Sheet, this can be easily done by anyone who does not have a technical background.
-
Real-Time Editing with Live Excel Sheet Integration: vREST provides you the ability to bind a data document (Excel Sheet, .numbers, .csv files) with a test case. Then, you can simply manage data in that data document, and the changes will be reflected in Real-Time in vREST.
-
Highly Maintainable Test Cases: Maintainability of your test cases is enhanced at a great level, because of the following two factors,
-
Minimization of Test Cases: You will have a very limited number of relevant test cases left, because now you don’t have to create an individual test case for each type of test data input.
-
Easy to make Changes: Making changes in data becomes very easy because you just need to make changes in a data document (Excel Sheet, .numbers, .csv files), and you are not concerned with the test logic at all.
How to do Data Driven Testing in vREST?
Implementing Data Driven Testing in vREST is a piece of cake.
We will be using Contacts Application’s API (this is a CRUD application where you can create, read, update and delete contacts) for demonstration.
To try out Data Driven Testing, just follow these steps:
(Here is the Github Repository, for Data Driven Testing test cases and sample data file)
Step 1: Setup Test Cases & Variables
-
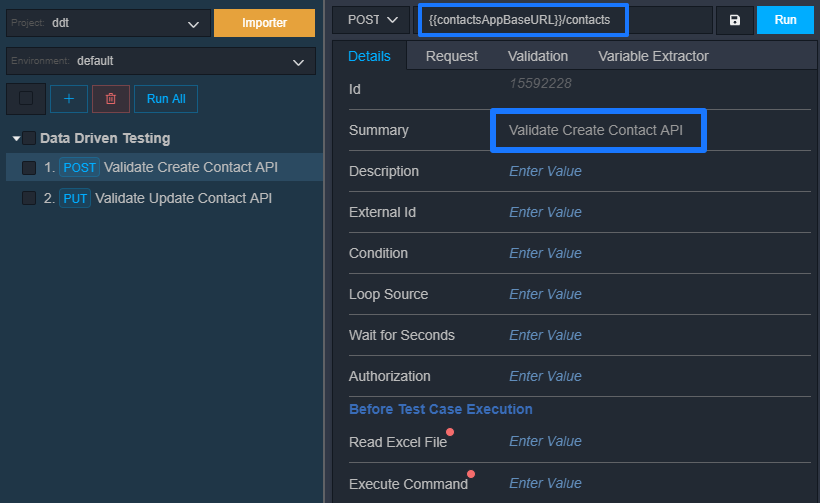
First, we made a test case for creating a Contact.
(We have created a global variable, contactsAppBaseURL, which stores the base URL of Contacts API)
-
Since, we are testing the Update Contacts API by using several data input scenarios for better API performance testing, so for that we have made another test case.
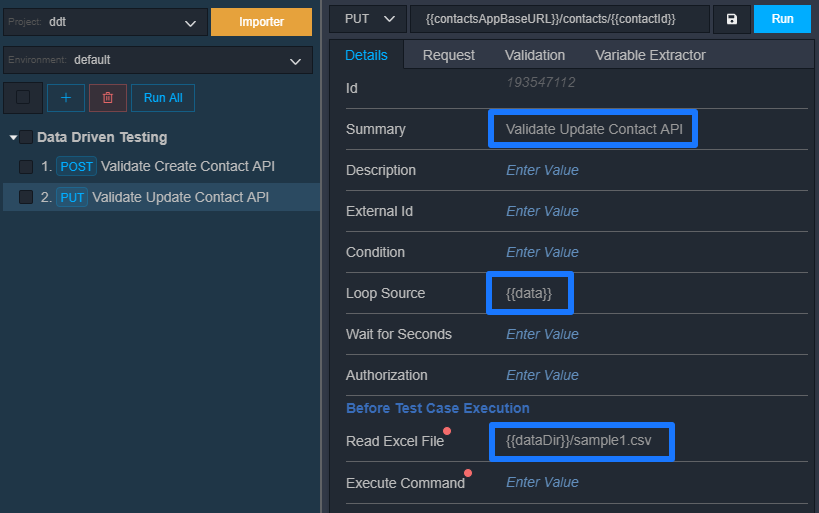
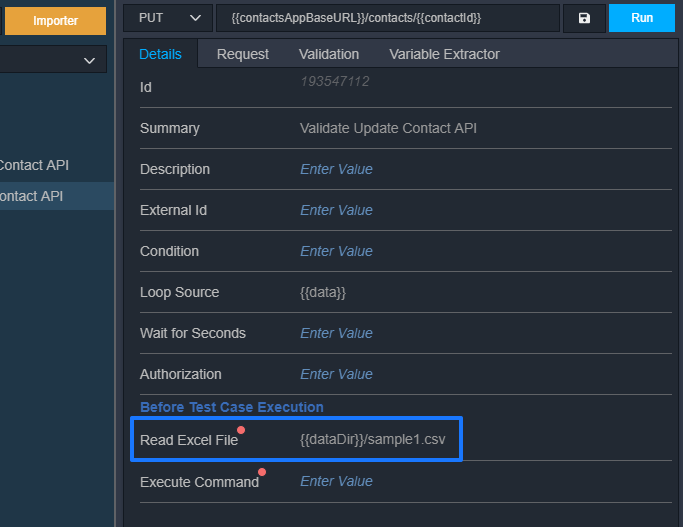
Here, you can see that we have used {{data}} in the Looping Section. {{data}} is a variable which points to the collective data from your Test data file. Adding this to the Looping Section of the automation tool will make the test case iterate over each row of your test data file.
Note: Each row in the test data file is acting like a test case.
-
We have created a variable that will store the directory location of test data document (once you clone the Test Data repository from github, you must update the path, by going into Configuration >> Environments / Variables),

Step 2: Bind Test Data file with Test Case for Real-Time Editing
Now, that we have set up our test cases, we created a CSV file as the test data document,
-
Once, created, the test data document in the automation tool can be bound to the test case like this,
Step 3: Write Test Data
Let’s see how you can write the test data in your CSV document when you are working for API performance testing,
-
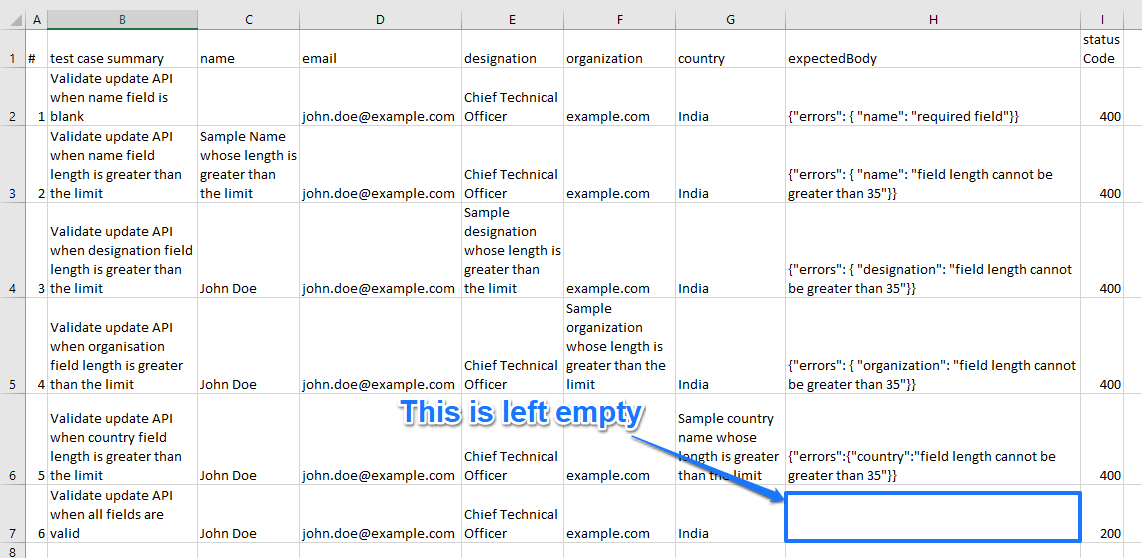
We have written 5 different test data scenarios, each including it’s expected response except for the last one (it will be filled later),
Note: Each row in this file is acting like one test case. Thus, we have 6 test cases in this file.
-
Let us understand the fields (columns) in the data file,
-
“#” – The first column is the serial number of the test case
-
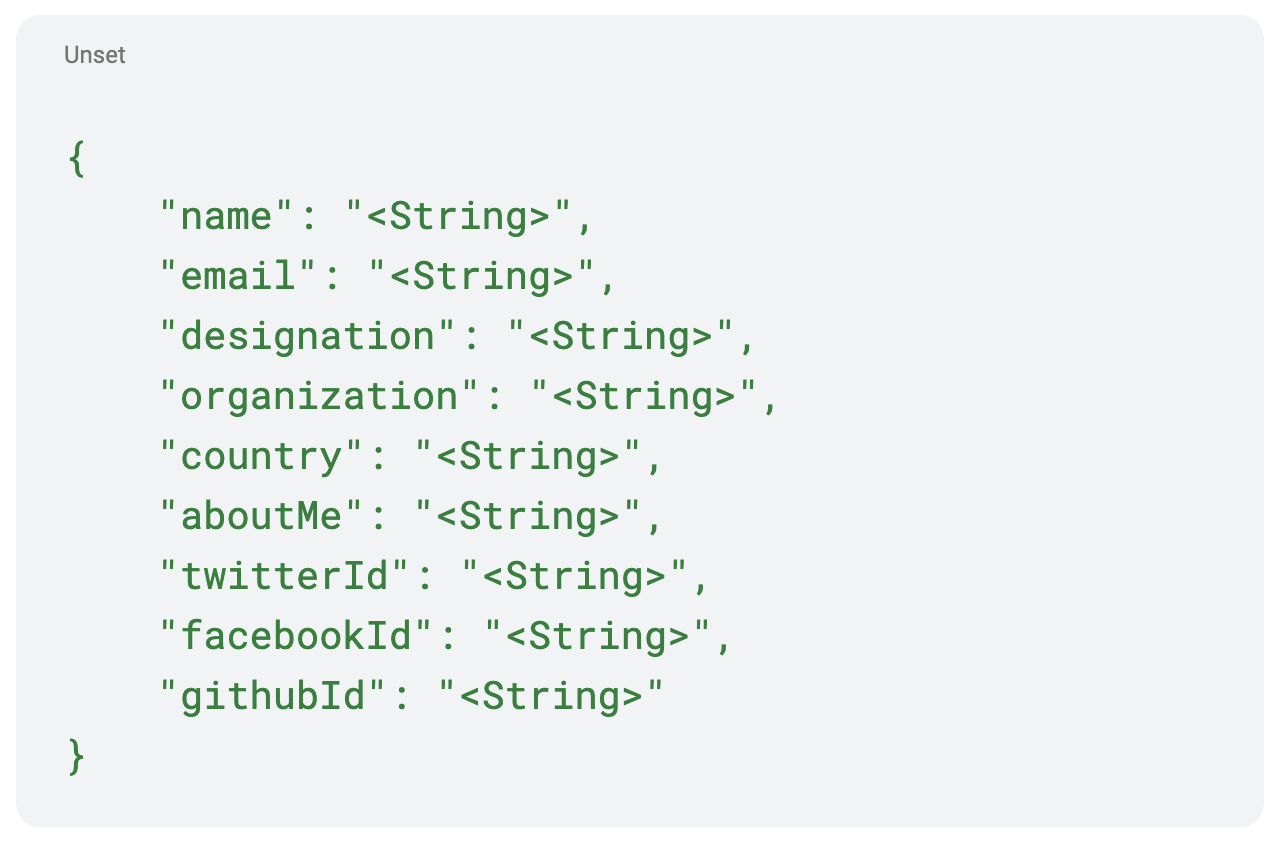
Request Parameters – These are the fields of your request body. For example, if you have the request body as follows:
-
Then, you will have to create the columns for “name”, “email”, “designation”, etc. (depending on which field is required and which is not).
-
Assertions – Now, you can add the assertions (in each columns) like, “expectedBody” where you can enter the expected response body, so that once validation is done, the Diff report could be generated, and, “statusCode” where you can mention the Status Code (200, 404, 400, etc) for validation.
Step 4: Run Test Cases & Analyze Results
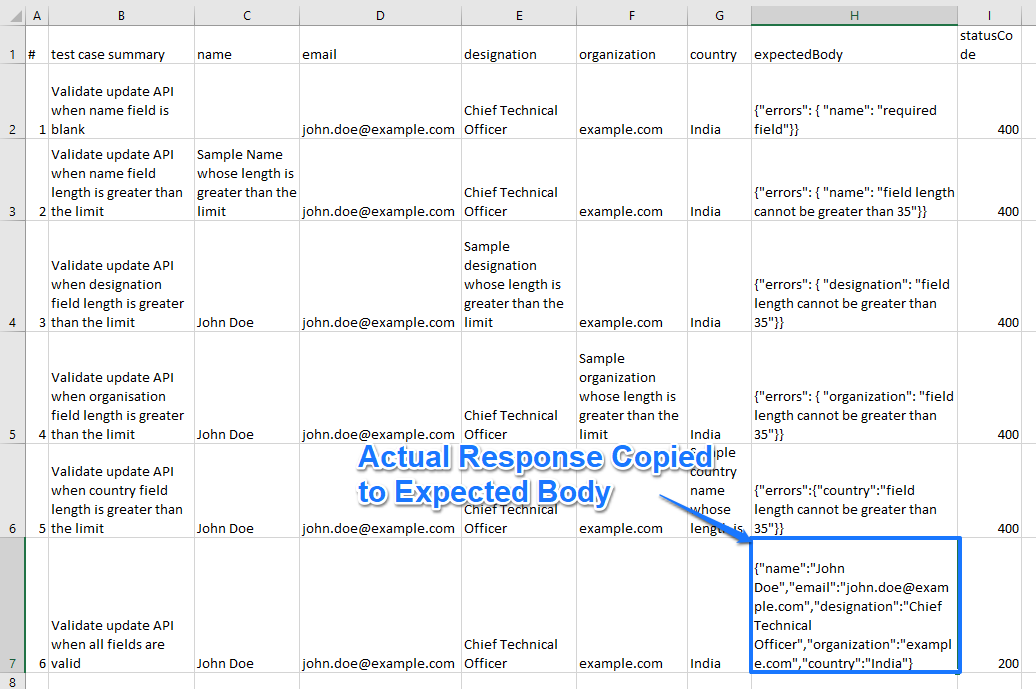
You can Run All the test cases and then Copy the Actual Response to the Expected Body in your CSV document when working on automated API testing tools. Let’s see how that is done,
-
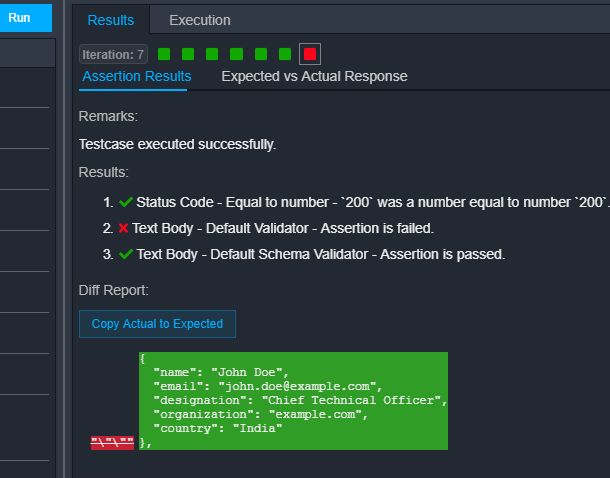
Once you have run the test cases, go see the failing iteration,
-
Click on “Copy Actual to Expected” in the Results section. This will copy the Actual Response to your Expected Body in your CSV document,
Step 5: Add more scenarios
By now, we have seen how you can easily separate test data from automation logic.
Now, let’s see how you can add more test scenarios into the CSV file.
Let’s add a scenario but keep the expected body empty
 Let’s run this test case
 Copy the Actual Response to the Expected Body (from the failing iteration)
 Let’s run again
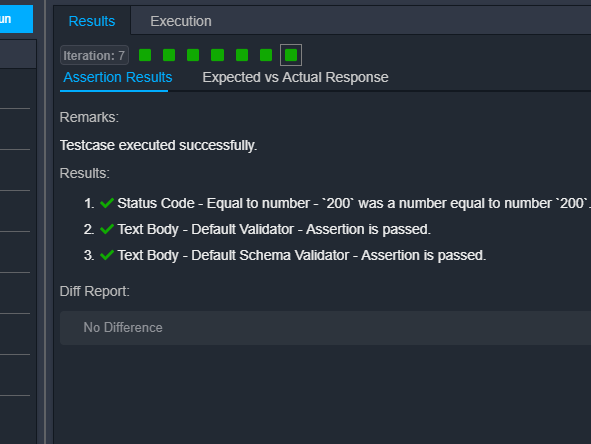
So, you can see how beneficial Data Driven Testing can be for your automated API Testing tools and its workflows.
